Tips for Tanning Buckskin and Fur On Leather (without chemicals)
This is not a step-by-step instructional but rather a bank of tips for someone with at least a few hides under their belt. Read through the whole list.
There are many primitive ways to accomplish the task of softening a hide. With the exception of fur-on skin, hide is immensely forgiving and can only be completely destroyed by uncommon amounts of rot (before tanning), burning from a carelessly strong lye solution or smoke heat, and cut scoring as it’s removed from the animal. Mold will destroy the clean look and contaminate other hides once it is smoked, so keep them away from plastic and airtight locations, and hang the hide in the sun often. Store a hide in a well-ventilated, sunny, dry location and use it. Loose in front of a window in a garage works well.
Plan your final wringing-to-dry soft session to follow immediately after wringing. This will take a few hours for a deer hide, and find a dry, warmish place to do it so it gets done quickly. If you need to rest, put it in a bag for only a little while, but avoid it if you can. Immediately sun-soak it. Black mold can take hold immediately and ruin a hide in the time it takes to smoke it, so act quickly. Hides were worked on sunny hot days, I imagine, so try and copy the environment.
ALWAYS dispose of the spent lye responsibly in a toilet or sink. DO NOT dump it into the environment. Scrape a lye-soaked hide where it will not drip so other organisms drink it—you must be careful and responsible with the use of lye to be able to use it without consequence—as with anything.
Also, don't freeze a wet hide. The ice will cut the collagen fibers, not separate them as is the goal of bucking. The cut fibers are much, much weaker. The Siberian natives knew this, I knew this, and now you do too. Always opt to dry the raw hair on hide if you need to store it. If you have a hide that has been frozen, don't worry now and tan it.
Buckskin and Smoked Moose:
- Avoid hardware pine to work your hides at all steps; this pine tends to support the growth of the same hanis black speckled mold that ruins hides.
- I used to use about a four-foot poplar log, debarked, to scrape my hides. One end is wedged into a stationary object at the floor, and the hide scrape end is resting on my thigh, pinching the hide with my side stomach. Now, the post I use is 3 ft of scrap beam, and the last foot is a fork in the branch; this sits higher on my stomach, and the fork keeps the beam from rotating while scraping.
- Never scrape on a beam angled lower than 45 degrees. You want to be able to use your body weight (so you can really dig in for moose and scrape). Use your back muscles, not your shoulders.
- Scrape the flesh side first and then the fur side BEFORE you lye or ash dunk a deer skin; this saves lye chemical, you aren’t worried about chemical burn, and it prevents contamination of the hair with the caustic chemical; this is also important so to respect the critters that will be exposed to the discarded hair. It's not much harder to scrape the hide this way.
- Global warming has lowered tick mortality. It is common to acquire a moose hide that will be ravaged by ticks. If you have a hide with live ticks on it, wrap it into itself in a ball, put it open end down in a big bin, and fill with water. The hide will open up flesh side up, with the fur submerged. Over three to four days, push the hide under the water surface and make sure it stays wet. Cover and leave in a cool place while this is happening. The ticks will mostly drown, starve, and fester—but believe me, those buggers have ten lives. Scrape and municipal compost or bury the fur; then lye the skin. Don't let them live.
- Scrape the flesh side first so the fur side is free of lumps when you scrape it; this way your tool won’t cut holes. Resoak the hide often, or it will fold over and stay there when you run your metal tool over it; this will create scores and holes all over your hide.
- I usually cut off the hide (often with an intentionally dulled blade). I don't want dirt getting on my meat—but one can also pound it off. Hold the skin taut and strike it with anything blunt and with heft.
- You must avoid scoring the hide if you use a sharp tool to remove the hide. The score may end up in a high-use area like a kneecap or shoe sole and weaken that area significantly.
- If the hide becomes green for any reason, it's often the case that the area can't be saved.
- If scraping over a beam, keep the area to scrape up close and near you; when working on a moose hide, it's best to be able to put body weight into the push.
- To make a good beam doughnut when wringing, you need to let the neck dangle until you can curl it into the curl. What this does is make the whole doughnut strong and full of hide so the ring will be even. If you just overlap, the mid-back of the deer will be on an extreme stretch, whereas the neck and rump will be under little. All said, a poor beam doughnut for wringing could also tear open and make worse holes in the back section of the hide.
- There are two methods of wringing a hide. This first one is more appropriate for a deer hide tanned whole. Place one edge over the beam, then flap the opposite edge up and cover over the edge on the beam. Roll one side to the middle, then the other to meet. There should be a loose doughnut of a hide around the beam. Put a stick through the loop and twist. The second method is used for small, dense hides, like moose quarters, but can be used with any hide. Make slits linear with the edge, close to the edge, all around the edge about an inch long and three inches apart. Use a stationary rod of some sort and weave four or so holes into the stationary rod and then through four on the opposite side, weave a rod you can twist. Twist left, then right, pull, stretch, and then change holes and repeat the twist left, then right, and so on until the whole hide has been wrung.
- The point of wringing before softening the solution is to break apart the fibers; with the solution, the fibers will be less breaking apart and more shifting and rubbing against each other to further coat all the fibers with oils.
- You should strongly consider splitting or quartering a moose hide for tanning. Dry the other pieces to store by hanging in a breezy, dry place. You will also be more inclined to use finished pieces for projects when the hide is not finished whole. When cutting said moose hide, cut it to as near a square as possible; this will make wringing the moose hide much more efficient.
- If you are in the field, you want to soften a skin without sewing to smoke it, and a vessel is not available. Rub a thick, softening solution into the surface of the hide and allow it some time to soak in; then, manipulate it over a smoky fire while it dries. You must push something poky into the tougher spots to really tear the fibers apart. You will feel the stiffness in these parts, like the spine and rump. Plan to smoke the hide thoroughly once dry.
- Use large vessels for your wet buck step. Tighter vessels inhibit expansion and fluid mobility.
- The critical step to finish with a stretchy deer hide is not acids or wringing; the following tip is really only necessary. If you were tanning a deer hide for the king, if you will be using the hide for outdoor mocs, it's not as necessary because the bonds that hold the collagen fibers together are so vulnerable when it is puckered. Take the whole hide and thoroughly rescrape, back and front, when the hide is PUCKERED, halfway to being ready for the thorough water rinse (even though the hair is already gone). Do this scraping in a shower stall. Pull and tug the translucent hide this way and that, over the legs, and step on it to try and pin it. The stretching will thoroughly obliterate the connecting mucus bonds, squeeze out mucus, and make softening a breeze. The hide will be slippery on a short beam, so rinse the hide under water, then use a cotton rag between your body and the hide as suggested by Matt Richards in his tanning book. Add an additional rag between the log and the lye-soaked hide. If lye crystals instead of ash were used, this scraping step MUST be done where the liquid and hide debris will not harm other organisms—use a shower stall. At this point, the lye should be so diluted that a brief scrape session should not affect your own skin should you choose to do this naked; however, I have burned my skin doing this, so be cautious and rinse well first.
A well-scraped hide, ready for a full rinse, will have vastly more stretch than a soaked raw skin; it will also look more translucent. If you do this well, you will have a much easier time during the drying/stretching step. You can somewhat take your time while hand drying later. For very thick hides, after you have scraped the hide in a shower stall, you can throw it back into the lye to soak for a few more days and then repeat the scrape process. You can repeat this step as many times as you wish, but with deer hides, only two scrapes in the puckered state are sufficient.
- Rinsing is important, as the loose "slime" still has a glue-like quality when dry and will still give the hide a rough feel when fully hand-dried.
- I don't use the brain or other fat-soluble animal parts to soften the hide. I use homemade soap and vegetable oil. Air on the side of more oil to soap as too much soap will prevent the oil from locking on fibers. The hide will end up feeling dry. I don't use soy lecithins, other emulsifiers, or eggs. On a side note, when our predecessors had an alternative to the brain, they would have used it. The brain, spinal fat, and marrow are far too nutritious and should be eaten rather than just sloshed into a hide. Know if the creatures in that area could be sick; there is a chance of bacterial or disease-causing infection that can be transferred.
- Your softening solution should be warm before mixing into the hide. Not hot. The hide should soak at room temperature.
- Only wringing the hide (without smoke) multiple times to break up the fibers WILL NOT WORK FOR MOOSE; the hide will require multiple smoking and wringing and no base dunk. Though the use of a base solution is never necessary when working with skins, it improves the result immensely. Multiple smoke and wringing sessions will work to make moose or deer hide soft; however, the final result is always far more stretchy, and in the case of moose, fewer smoke stretch sessions are required. The harder and more often the shower stall scrape sessions you put into a moose hide, before the first brain smoke cycle, the better the final result.
- Smoking locks in work already done. Smoking may be time-consuming work, but for the amount of work you have already invested, it is worth it. In addition, a redunk will distribute the smoke color throughout the hide.
- Non-framed hides come out denser and smaller. You may find a moose hide that was not framed will be far too dense to be used for clothing.
- I hand-soften the moose hides I have made; I did not stretch them into a frame while drying (or at any point). I achieved this by throwing it over a long beam and pushing a tool into the whole surface in various directions and pulling in various directions, not unlike the physical treatment a frame drying method would provide; as mentioned in previous points, the attempts to work the surface were not done on an ongoing basis until dry, as one would work a deerskin. The log helps hold the hide open and dry. Moose takes a long time to dry—environment depending. Don’t work moose hide until it dries. Only make sure the moose hide dries as big as it can be, smoke it, then repeat—soak, wring, dry, smoke.
- A thick, un-smoked cow moose can take as much as five or more days to dry indoors in a 1°C garage. Overnight you can roll it up and put the hide in a dry bucket with a cover; lay a damp, clean cloth over the hide or just leave it. If it's warm, put the bucket containing the hide in as cold a location as you can find—fridge, outdoors.
- Wring and rinse a just-dyed skin as many times as your attention will allow prior to the brain or softening agent soak and wring stage for the wet buck method. It is easier to further break the fibers up and clean out mucus on the twist doughnut while the skin is tacky and oil-free than when the brain or soap/oil combination is in it.
- Wring rump to neck and also side to side; any angle would not hurt. The aim is to put a destructive amount of stretch from random directions into every collagen fiber that makes up the hide surface (particularly the neck area), repeatedly. Turn over the soggy bulges into the squeeze so they get stretched. Fold in the loose tags. Turn the wring stick clockwise, then counter. Rotate the loop a few degrees.
- The shape of a deer hide is not rectangular, so in order to stretch the neck, stretch the hide wide and fold it in half. Place the hide on your horizontal beam so that one side's legs are over the beam and the neck is pointing to the rump end. Lay the two other dangling legged sides of the hide over and onto the legs already clinging/sitting on the beam. Roll your doughnut and twist. You will have to replace the neck as the hide is curled. Do this one after the hide has been stretched and is free of most moisture.
- Be conservative with softening solutions. Using more is not always better, as you may just make an oily hide. As long as there is a creamy color in the water, it has something to offer the hide on subsequent hide soaks.
- When wringing, make the donut; twist slowly if you have to. Slowly twisting will allow liquid to slowly drip out. The hide will eventually catch on itself and lock so it won't slip apart, resulting in the donut needing to be refolded; this works on the slipperiest of hides, only having to twist slower—initially.
- pre-stretch a hole before stitching. Use sinew when the hide is moist just prior to the drying manipulation. Poke a smalk hole with an awl, then use a glovers needle or other snall needle with sinew thread. Be generous with your sinew thread length. Sinew is abundant if you were diligent and took the time to harvest it during the butchering.
- I often don't bother to stitch small holes before smoking or drying; this will only make a big mess of holes in that area, and the stitch often comes undone anyway. Be cautious with skinning and scraping next time. Small holes are sewn after the smoking process by sewing, wetting the whole area, and then drying it flush.
- When hand drying, nearing the end of the drying process AND after fully dry, at any time, but BEFORE stitching to smoke, stretch the whole hide by really reaffing the hide over a poke tool, stretching it, and making it as billowy as possible. Any non-billowy, flat-feeling, or stiff spot, especially, work over a beam until it becomes fluffy and spandex-stretchy—like the natural feel of the pit areas of the hide; this will ensure the whole hide is ready to breathe in the smoke to coat and lock loose all the core fibers; this type of hide will also be much warmer to wear.
- While drying, focus on opening the hide by stretching with your arms. Focus on the border primarily through the beginning and most of the process; then, use a poker beam.
- Lye solution should be disposed of responsibly (toilet).
Fur On:
- The very first step is to remove any and all membrane from the hide.
- Generally speaking, a fur on hide must be stretched in a frame; this accomplishes several things: it thins the hide, it dries as large as you want, it ensures a flat surface for membraning and scraping tools, and it secures the hide so you can easily work it.
- You should thin and membrane hides; need is more appropriate a word for moose and bison (never tanned a bison). Thinned hides absorb oils better and so are easier to tan and soften.
- The following points mostly apply to how I have tanned deer hides, without framing, because they are still pretty thin. Thicker buck skins should still be framed and scraped before working.
- There are two objectives once the hide is off—stretch and dry. Stretch the hide, just so it won't shrink or misshape and dry, so that the hair won't begin to slip; these can be accomplished by using a frame, tacking, or laying it on the concrete or over logs and periodically going over it and opening it. The flesh and fat MUST be removed (especially for fatty animals like bear, beaver, and porcupine) before the fur on the hide is left to dry, or the areas where these are left will take longer to dry, and the hair will slip; immediately throw it over a beam and get that done. The hide should be fully fleshed too at this point. Damp, curling spots left as such will also slip, so keep them open. Don't worry about degreasing the fur or getting dirt off or having it soft just yet.
- There is no need to continuously stretch and work the hide as it goes from damp to dry with hair on (or for a thick furless skin either). For example, with a deer fur on, you can probably get away with 5 full hide stretch/pipe tip work sessions a day until dry; these times are weather and environment dependent. A thin hide, like hare, I wouldn't touch for a few hours after skinning; simply lay it flat, untacked, and wait. Once the hide becomes dry enough to hold its shape, you can leave it if you want and work it with a pokey tool when ready.
- When working on a hair-on hide, some hides just won't come out soft as easily as others, as they are just too thick. It would not hurt to rub some oil into the flesh side before working it. Throw over your scrape beam far down to work.
- One other way to work a hide is to find a clean floor and lay it fur down. The area to be worked should have a quarter-folded towel or even another hide to add loft to the work area. Pin the hide with your knee and push a sharp but dull tool into the hide in a forward working motion. Be careful as you WILL tear thin areas. The benefit of this method is that it keeps the dander down.
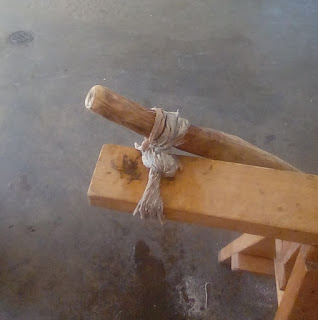
- Yet another method is to just work the hide over a sharp 2/4, like the one shown above.
- Small holes should be left alone; tears must be sewn. ALWAYS dampen an area to be sewn to a soak before using sinew to sew it. This border will then dry strong and will resist the stitches tearing later.
- Thick hides often benefit from taking time for tacking or framing; this will stretch the skin and thus thin it, making it easier to soften when dry and removed. Thick hides like moose, hair on, must be framed and thinned with a sharp tool and then removed, oiled, and worked.
- Blood is easily cleaned off by rubbing snow vigorously into the fur and shaking the piece.
Grain On
- To make a grain on hide, scrape the flesh side with hair on, soa,ye soak, pluck hairs, dispose of hair in biobin, twist, and treat as a buckskin.
- If smoking with the grain on, be prepared for a long smoke session or several. When the grain layer is left on, the smoke takes a long time to "color" that spot. If the material is breathable, the smoke will make that area dark rapidly; if not, it seems to just want to bounce off. This also explains why a long smoke session with a hair on will still leave a light smoke—the smoke is gliding over the surface, as opposed to penetrating through it.
- If you want to make leather with the grain left on—a far easier way of tanning (I am told)—research "traditional bark tanning."
Smoking:
- Cut away the hard border to the soft hide. Soak the cutaway border and wrap it tight around a beam. When dry, cut away the poking areas to make an even, long, strong thong.
- Don't sew the hides until you are ready (within a day) to smoke. You reduce the chance of a black spot mold ruining the hide.
- When smoking together, the hides do not need to be the same size or lined up, but it's helpful.
- Use a long smoke skirt at the opening of the smoke sack to avoid scorching inside the hide.
- To connect a deer hide for smoking, an option is pitch glue. Pitch glue is quick to apply and will maintain a tight seal. This glue is also relatively easy to make in the field. Dab a line across the rim about 2" long and then push together while the glue is still hot. Resist the urge to "draw" the glue across the rim; this makes a line with inconsistent strength and can create lumps of glue on your glue line. I use an oil lamp setup to heat the glue and dab.
- Punch sew holes in a moose hide with a bone or metal awl and mallet, then sew with cord.
- A tighter seal, with fewer holes and places for smoke to escape, creates a more even smoke color on the hide and shortens smoke sessions.
- A method of sewing the sacks of deer is to have delegated long buckskin thongs and use only an awl to punch the hole. Having a long, fine taper on the end of the thong makes it easy to poke through the hole punched by the awl. Pinch the hides tightly and poke a hole just forward of the pinch. Hold the two hides together tightly while sliding the thong through.
- Another method is to make a loose hole in a 2/4 and slip the awl (5-inch iron post nail, tapered to a fine sharp point) through to keep the awl up and steady; the hole does not have to be tight on the awl so you can remove it easily after. Push the overlapped, lined-up border onto the awl to make a hole, and then slide the stitch thong through.
- My current method is to make a really fast running stitch with a cheap thread. Longer smoke sessions, but whatever. I also drape a cotton bedspread over the sack to trap extra smoke.

- I have used dry pine lumber (barkless), which I would not recommend; dead standing or hanging branches; dead spruce branches; dead tree bark; or anything of a small enough size that will fit in my smoke pot. I dont use punk that has been sitting in a bucket for a long time and material that harbors other organisms. What you don't want to use is anything damp. The moisture can initiate a mold even in the few hours the smoking takes place.
- I've noticed black spot mold growing on store-bought lumber - its probably best to use only fresh, dry punk. Anything with the black spot mold can spread spores in the smoke to your hides.
- dry punk is the best smoke material—it seems to simply smoke the most, and it is easy to smash to bits.
- Spruce and pine have a resin that smokes from the wood; the hides that are smoked with these woods tend to finish stiffer and rougher, "clammier"; however, they are probably better at resisting water and mildew.
- sew holes with either the same hide made of a thong or sinew. Big holes or cut gashes are sewn only with hide thong. Sew just before working dry.
- You can comb out rough fuzz when dried, just before the skin is ready to smoke, with a light but sharp wood rasp. You can also use a rasp to lighten burnt spots post smoke. I saw a wood handle with a can wrapped around it in a native camp once. The can had nail holes punched through so the protruding metal was poking outward; this tool is used to abrade a skin surface.
- get dynamic when smoking. Move the sack around gently, exposing the folded tight spots to the smoke within. Push the odd sags in now and then.
- don't leave smoked hide or partially smoked sacks intact for too long. Dampness and mold will develop. Separate the hides and get them hung in a sunny open space ASAP.
- (never tried this myself) use the hair (from a bucking job) for an archery target stuff sack. Better for the environment than chemical-coated cotton or plastic/polyester fibers/rags; God help you and us if you used that shit.
 | |||
| You want a needle for sewing with sinew and a buckskin thong. Fold an iron wire into a U and pull the iron cord ends through the hole with pliers. Prepunching the hole with an awl is necessary. Often a good glove's needle or any needle with a large hole is best to have on hand. | - I use an 8L stainless steel pot and lid while smoking. If you want to sit for eight or more hours, watching the smoking, a skirt that will fit around the pot with the lid of the pot left a crack ajar is fine. The opening may vary to regulate what goes in and out of the smolder. The lid greatly, but not fully, protects from flare-ups and heat, which may burn the skirt inside. You can't completely leave the pot smoke, as the heat will transfer from the side of the pot to your skirt, even in winter; I've still had hides lost to fire with this setup alone. The lid is a failsafe addition, not a guarantee the smolder will not scorch or burn your hide. Do NOT leave the pot to completely burn before checking. You must keep the smoke heat buffered with smoke material on top, or you will get scorching marks on the inside of the hides from the hot smoke. - My current system is to use a trash can and to place the pot with the lid ajar inside. The skirt must cover the trash can opening. This approach avoids concentrated smoke patterns on the hides, scorching of your skirt, and burned hide. I suggest paying attention to how much the lid of your inner jar is open, however. You may be tempted to leave it too open, thinking that now you can really rush in the smoke without worrying about a fire. If your inner pot lid is too far open and all the smoke material inside burns up, it is possible for the content to still ignite and you have a fire that will reach your insides. A long steel chimney setup of some sort may be an alternative. |


I also use this pot for making char cloth or carbon brickets. I can cover the numberous holes with cinder while it cooks to give the pot an air seal.


Right to left: Bone awl, Deer awl, Moose awl. The bone awl works well on the thickest and toughest moose hide when used with taps from a light mallet; just make sure the tip is sharp and the shaft, a slow taper; it seems to slide through hide better than steel. The metal nail awl is great for pre punching sewing holes in the rawhide rims of the "softened" moose hide to create the smoke sack.
 |
A huge part of the challenge of making smoked moose hide is knowing how to accomplish the task efficiently, which I am currently of the mind is not something you can teach. I've used this method to work a moose hide. Using this method, the most difficult feature is lifting and maneuvering the whole thing, which is not attached to the sawhorses. If you learn quickly, you don't really need much pulling force at any point to find ways of putting a huge amount of torque into the hide. Be CAREFUL; using this method requires the moving of heavy logs and careful balance while being able to attend to the threat of the logs swinging back in your face or feet and hands being pinched. The logs are taken off the horses, and leverage is found using your weight, gravity, and the floor in X's—it can get dangerous and at times is rough on the horses. You may want to use a smaller bucket to catch the liquid or even a lid and drain it back into a larger vessel. DO NOT USE THIS METHOD IF YOU ARE UNCOMFORTABLE WITH THE DANGERS INVOLVED AND THE DAMAGE IT MAY CAUSE TO YOUR SAW HORSES. There are other ways. A better way is to halve the hide and use holes made on the border as described in my moose tanning articles. The reward of doing something is never only the final product; in part, it's an efficiency with which the task may be done the next time and a deep understanding of the tasks and materials—lessons which cannot be taught without being earned. buymeacoffee |