Acquiring, Manufacturing, and Straightening Wood Arrow Shafts


For raw fresh wood, don't use soft woods like spruce saplings; even though they are generally straight, they are weak and light.
When selecting a raw shoot, keep in mind that there are several obvious reasons why you want shafts to be sourced from relatively straight wood; however, a less obvious reason is that every time a shaft must be straightened, micro cracks are formed (an effect exacerbated by the severity of the initial natural bends of the wood), and these cracks will ultimately weaken the dried shafts.
Heat treating wood, to fix a bend, is also made brittle; this makes a weak spot in your shaft, which will reduce service life.
Select saplings of the right diameter and ones free of sharp kinks before they're cut down. Waste is something to avoid when taking life, and you know the waste if the tree finishes unsuitable for the shaft.You want a strong, robust, heavy hardwood shaft with few branch knots on the shaft (like cherry, saskatoon, or ash); this will reduce the necessary diameter of your shafts—a quality you want. Knots will be areas of extreme weakness.
You can save the culled top growth for bark tea; process it by smashing it further so the chemicals can easily leach into the hot water; you can also use these when dry for smoking skins. If you use the top growth in no other way, at the least, push it close to the ground so rabbitscan easily brouse the buds and bark from the shoots.
Select more overly mature shoots than "just right"-sized ones, which at this point are still wet, bark-covered ones that thin out when water is removed.
Generally, a tipped arrow can come from a younger shoot; however, always use the narrow end as your nock and the heavier end as the tip. I used to knock on the root end to save a more mature tree, but now I choose these more mature saplings for my shafts and knock on the leaf end, as you should have a front-heavy arrow; avoid practice where it is easy to lose an arrow shaft. If you don't lose these shafts, they will last a very long time, through tough hits; believe me, they aren't anything like junk delicate cedar shafts you buy online.
A less realized reality of front-heavy, root-end-first shafts is the ability to stay true with small sharp tips, whose weight may not be enough to maintain a front-heavy shaft otherwise. In other words, use the wood to add mass to the front and overall weight of a shaft.
What you don't want to do is cut, debark, and attempt to straighten all in the same time, as the shaft will be too wet and green and simply won't want to hold a bend at all. Once the bark has been removed, wait about ten hours to a week depeneding on conditions of storage.
After harvest, you can wait about two weeks to debark, or until the bark starts to crinkle, for cherry. Don't wait too long to process your shoots, or the shaft will be hard to debark, reduce, and bend.
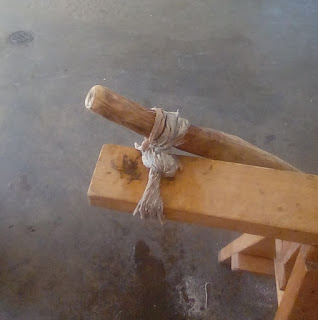
To carefully straighten the shaft, the well-shaped antler (or steel, maybe hardwood) wrench shown below (long handle with a hole well angled, which won't dent the wood) is your essential first option tool, but a less effective and more labor-intensive tool is a stone corner.
Hone a good blade, and train your hand to slice away the bark. I have tried a potato peeler and moctocun but prefer the knife for debarking. Work down the wood so the shaft is just wider than the desired finished diameter through the length. You can save the bark for tea, bark-tanned leather, or shavings for a fire or smoke for hide smudging.
Worry about making the shaft perfectly round while debarking and reducing it with your slices; it will be less easy to round later, when dry. Sometimes I slice, and then round by holding my edge at 90.
You shouldn't have selected a shoot with any major kinks, but if you did, these must now be removed.
Neatly and tightly, spiral wrap the bundle of shoots with a great number of spirals. Store it like this; to do this, make one end flat, even, and tight of the bundle, and tighten this with a strong cord. Wrap the cord around your foot once to provide enough tension but slide when you need more slack.
The diameter of the shaft will determine the arrow "spine." Too thin (or under-spined), the shaft will bend and wobble. If the head is too heavy, these imperfections in the shaft will be exploited to a greater or lesser degree. If the shaft is "overspined" or too thick, the previous imperfections are not an issue; however, the shaft will be unnecessarily heavy, requiring more power and whip to provide the same speed as a more appropriately shaped shaft.
The reduction of the wood for your shaft is a focus of importance. You need to find the sweet spot based on the natural characteristics of the shoot, bow strength, and weight of the arrow tip.
A note on grooving, which is to carve three or four lines down the shaft from end to end: do not bother, as this will only make your practice arrows, which must be tough, far weaker, as it damages the wood fibers the length of the shaft. If you choose to try this, do it AFTER you force bend your green shoots straight and befor bundle drying.
I recall a primary source describing the curing of the shaft bundles, or drying, being done over a fire to make the shafts particularly strong. I don't, but maybe one day.
After drying, the final surface finish step is to use your arrow wrench and run it down the shaft vigorously, multiple times; this will "burnish" the surface and give it a smooth shine. Not necessary for practice shafts.

Drill a shaft hole into the butt end of an antler with a very long handle. The hole must be shaped large enough for heavy shafts and angled heavily so the bending will not mar your shaft. If you take archery seriously, the investment of the antler piece is required, though another hard material like steel or hard wood may work too.

Get your shaft straight by having a hole like this to shove it in.


You shouldn't have to heat a shaft to make it straight, but if you do...
Hold the bend over heat and gently bend out of the curve as the wood softens. Hold the bend straight until the wood holds itself.
When heating, do it slowly. Apply heat two inches from the flame for half a minute or more. You want hot throughout, not scorched on the surface and cool in the core.
Heat applied responsibly in the above way should be used all the time when fixing the minor bends left from straightening. Heat not only makes bends last longer but also softens the wood so bends can safely be made without damaging the wood.
Re-spiral-wrap the shafts until ready to use.
Show support - https://buymeacoffee.com/ropesuspenders