To Tan Moose Hide. Easiest Way.
Try to follow the article, but realistically you will only really understand it if you tan thick hides a few times.
Don't let the title mislead you—tanning moose is never a fast, easy process, regardless of what you may read in any old text.
This is my method of tanning moose. The process is just as you would tan a deer hide, but everything from wait times to wringing to measurement is tripled if not quadrupled. The only other difference is I avoid tanning a whole hide at once (I've never tried it using this particular method), and instead of using a doughnut and two poles to wring the hide, I cut strong slits on the border and wring the hide by securing a few of these at once.
Moose is not (really) a worn-on-the-body leather; it's great for bags and winter mocks, but it's heavy for leggings. I'm sure if you made a really soft hide, it would be adequate for a jacket.
Cut the hide into a half (or quarter if you're a small person) unless you absolutely need or want a whole hide; in which case, the drying process would need to be done by framing the hide. A split at the waist (or center) is easier to work with, maneuver, and store, and you're going to cut the finished hide for projects anyway.
Try to cut the hide so you are working with square pieces; this is not necessary, but it helps a great deal.
All the hide must be scraped; the parts not to be tanned should be cut away and discarded at this point; if they won't be tanned, you can try to scrape them and use these parts to make glue.
Scrape the fur side first, then the flesh side (the opposite order of deer skin).
Fully scraped hides can be hung and dried for a time when they are ready to be used.
Slits must be cut an inch long, two or three inches apart, and three-quarters of an inch from the edge, all around, parallel to the border; the idea is to make these slits quite robust, as they will be under quite a bit of strain; they will be used to twist the hide and stretch and wring liquid.
The best finished hides, deer or moose, must be lye dunked and stretched/worked puckered; you don't NEED to do this step, but it will soften with far, far fewer smoke twist cycles, and the moose hide will finish stretchy, billowy, and breathable and not dense. Use a base dunk.
*NEVER use lye irresponsibly. NEVER expose animals or insects to lye water. *
Dunk the hide in a lye water solution for three days and break it in a shower stall by wringing and twisting. Soak again in the lye water bucket for a couple days or more and break again. Repeat the dunk in lye, wait, and work cycle over and over and over until the thick hide is gummy, flexible when puckered, and very stretchy. Your patience with the step just stated is really the key to making a soft, stretchy hide.
I used to scrape the moose hide over a beam in the shower stall; though this works fine for thinner and/or larger hides, like deer, moose hide is just so thick and stiff when puckered, it slides all over the place when on the beam—especially when the hide used is quartered or awkwardly shaped, so use the slits and some wood dowels to twist and wring. Find two strong hardwood shafts; short, like a foot and a half long. Weave four or five holes of one side on one shaft and the same opposite these with the other shaft. Twist left, then right, and lift gently. The hide should squeal. Go around the hide, hitting all holes. The holes will sometimes rip until you get an idea of how much they can handle and how to cut them.
I do this in the nude. The lye water can burn your skin if it is too strong or you leave it on your skin too long. Rinse the hide before doing said twist work step. Use other forms of protection. Maybe have plastic bags (you will use them for trash anyway after or reuse them again) for each leg? The risk and reward is yours.
When making the lye dunk solution, you will need to add far more lye, in total, than you would with a deer, but you must pace your lye saturation. Start with a little more lye than you would add to a thick deer hide. When the moose hide looks like the lye has lost strength, or in a few days, add more lye. Eventually the hide may have absorbed much of the lye in the bucket and look white like unpuckered hide instead of translucent; the water will also be a tan color at this point. You can dump the water and start a fresh-strength lye dunk.
When the hide is in a lye bath or being rinsed of lye, it will stay sterile.
When the lye and twisting have broken the hide thoroughly, rinse by repeating the shower-scrape-dunk in fresh water (instead of lye water) until the hide has become a milky white, sloppy, weak, sponge-like skin instead of the dense, non-stretchy, tough hide it once was. Use the twist method described below to squeeze out all the salt or potassium-based water so the hide will take in fresh water and so reach the unpuckered state you need—this will also help loosen and break fibers, which is what you need to do. DO NOT do this in a place that the rinsing lye water can be drunk by animals or insects.
When the hide is white, rinsed of lye solution and sticky mucous, and broken-stretchy, dunk the damp hide into a solution of soap, vegetable oils, and water (I have tanned many hides and only twice used the brain; it's just not something I use in a hide).
Slosh periodically and allow to soak for two days.
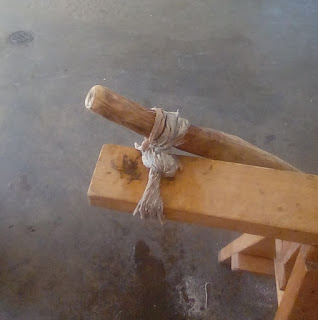
Weave a rod or some other strong stationary beam or cable through four to six holes on one side and another rod on the opposite side woven in the same way. I have mounted a robust wood dowel to a sawhorse and slipped four or so holes onto the dowel. With a short wood shaft, I weave the same number of holes, opposite to the nail holes, twist, and push down in the middle, twist the opposite way, and push down. The edge of the wood in the image, just forward of the bowl, takes a huge amount of stress from the cut mount holes by using the edge to lock onto the twisted portion; this reduces the chance of the laced holes tearing.

You work your way around the whole piece so all the holes have been used. Twist left, then right. Focus more on the pulling and stretching and then the twisting, instead of just twisting, as this will tear many of your holes. The holes are very weak and will tear until you get a feel for how much twisting and force they can handle; if this happens, cut away the open tear and simply make a new slit just beneath.
Catch the softening liquid as it is wrung from the hide.
The above-described twist method will enable you to focus on and tear apart the dense and hard-to-work hump section.
After you have wrung the softening solution from the hide, throw it back in the solution to soak for a day, and then repeat the wringing. Repeat this rinse, wring, dunk cycle many times until the fibers are well coated. Chances are, with a thick hide, you can add more softening solution to the dunk bucket, and the hide will eat it all too.
The softening process can take many days, and the hide will make ripe smells. Some days or nights I leave it in the fridge.
After the final wring, the hide should now be damp and coated in oil soap solution. Sew the holes using an awl to punch holes through both layers of the hide adjacent to each other. Use a hide thong with a folded wire to lead the stitch. A hole in a piece of lumber will help you push the awl cleanly through the thick moose skin.


Holes and gashes are tough. The folded area to the left and right of the hole will need to be cut to make a flush stitch. I decided to leave the hole. I can stitch a patch or something after the hide is finished.
When damp dry, begin the dry stretch process by working the hide in all directions, stretching by hand and over a pointy beam (this is important). Run the hide on the poky object in one direction, then pull it open in the opposite. The more thoroughly and heavily the hide is worked during these work sessions, the sooner your hides will soften.
Work the hide, then let it sit to dry, then in a few hours, work it again. It is critical that you work moose and hair on hides passively (environment-dependent). You will use too much energy working a damp hide that simply needs time to let dry. If you want a workout, get out in the sun on a breezy day—use your head and choose how fast you want to finish.

If at any time during the drying process, you want to rest, plastic bag it and stick it in a cool place like a fridge; avoid the freezer as ice cuts the fibers.
Do not worry—it probably will on your first hide, dry stiff in areas on the first go, and stop, and don't worry when it does. Only make sure that the piece dries as stretched open as possible.
However, if you have my experience, you may be able to achieve the unthinkable on a first go-around...
(I'm hiding the hump.)

When the hide is fully dry, return to softening the somewhat soft areas to make those billowy and fluffy. Areas like a hump and border may be like rawhide, and this is expected for your first hides on the first soak/smoke go-around.
When the hide is dried, just get smoke into/onto the hide. Use a towel or other rags to quickly seal or cover means for smoke to escape.
The hide may (but shouldn't) be so stiff the first time smoking; you may want to do something like slide the pieces under a supported cotton blanket and smoke pot located in the center to make a sort of smoke tent, which will put the initial color on. Don't worry about an even color, as later soaking will even out the coloring. Keep a keen eye on this setup, as you don't want anything catching fire. Given the amount of work invested to this point, this would be catastrophic. Use a pot with a lid or a jar to protect from scorching.

When dry or after a smoke, slam both sides of the leather with sun for a few hours as a countermeasure for molds; at any point the hide is dry, this countermeasure is a wise choice.
After the first smoke, repeat the whole process from the dunk in softening solution step to smoke until the hide and fibers are fully covered in smoke color and oils and the hide is flexible. You won't need to pay attention to stretching the hide as open as possible during the drying process after the first smoking of the surface.
Also, after the hide has been smoked once and is soaking in the softening solution for two days, it is important that you wring it, as above, to break up fibers; then let it finish the soak duration.
Expect this to take at least two whole cycles, more or less based on how well and disciplined you wrung it the lye dunk step and softening soak step.
Even if you somehow make a soft moose hide on your first try, you may want to redo the whole soak-smoke process anyway, as water mellows and distributes the smoke color.
After the hide has reached the final drying cycle and is now ready for the last smoking, cut away the holes on the border and use a heavy awl (which you may also need to use a mallet for) to make holes and create a really tight seal for the final smoking sack; this is not necessary, but you really want a thorough smoking on the final smoke, one that penetrates deep into the hide and can only be achieved with a tight seal.
Show support - https://buymeacoffee.com/ropesuspenders