Fletch an Arrow with Natural Feathers
*This style of fletching works for dynamic archery and will not suffice for shaft, sight aimed, or any other static archery style; in these styles of archery, consistency is critical. Embrace your own needs and designs as they become apparent but this is a good start*
"Under the most favorable circumstances, however, the most skillful Indian workman can not hope to complete more than a single arrow in a hard day's work. In a short fight, or an exciting dash after game, he will expend as many arrows as will keep him busily at work for a month to replace."
A well fletched arrow, and the arrows condition all together, is critical and a far second to the manufacture of the bow, where all that is generally needed is something that draws a string taught fast.
A powerful draw and cast will need to make up for an over fletched arrow, due to the drag, and good skill with a bow (within a limmit) will need to make up for scant or dammaged feathering.

At the quill end of the feather there is a portion where the feathering abruptly grows toward the opposite side of the vein; from the down-less tip (quill) begining of the feather to where tough, randome feathering ends and the rest of the feathering continues up one side of the vein, the feathering can be removed.

Grab the feathering where the randome feathring begins and peel down and away.

The two "sides" of the feather must be split down the center. Find the line in the centre of the quill on the feather, and follow it with the tip of a sharp tool as far possible. I use a very small ulu shaped knife to roll through some of the vein and slince to finish. Glass is what you want to acheive in youre tools. Keep a stone on hand and cardboard to glass.

Using small feathers is fine, but they will wear to useless sooner so you will need to put four or more on your shaft to maintain a strong guide potential.
You want to be able to use as many of the usful arrow feathers as you can from a bird or to be able to bring to use a random floor feather - this method suits that goal.
I prefer a lot of feathering on my shafts. Shooting an under fletched or heavily dammaged fletch is something akin, I'm guessing, to trying to pilot a rocket or plane with dammaged wings.
I like to have long veins on my shafts with short feathering; so, while using only short feathers, don't be afraid to put duel rows on the shaft; that is another three or four in front of the first three of four; this style of fletching (which I made up), will work and will use the small feathers of smaller birds or randome ones found on the ground.
Also dont be affraid to put six feathers or more if you can in one section. I use short bows now and my shaft length has shortend such that duel rows can effect the accuracy of the arrow.
You dont want your fletch to reach beyond 2/5th of the length of the shaft. The farther forward they start, the more difficult it becomes to maintain a true shot.
Shafts destined for broad heads or hunt points, require significantly more and precise feathing than every day practice or small game blunts; this is due to the trajectory effecting design of a flat broad head at the nose of the shaft.
Whith dynamic archery, I find my fletchings dont have to be perfect pr symetrical between my arrows. At short distances, i just want a true flight. Im not a bow hunter in the strictest definision either. Just try to aim for a near similar total resisance which should be consitent with consistant lengths of arrows for a barticuar bow.
Idealy you want to select the long wing feathers of a bird. The tail feathers will work well too. You want to use rigid feather portions; soft feathering tends to just flap down and become useless; the difference has more to do with spieces than location the feather has grown on a bird. I recall reading somewhere some tribe thought it was a spiritual violation to hunt owl; it happens that owl makes awful fletching; turkey, hardy goose, grouse (though small and short) are great. The louder the birds flap, the better the feather for arrows.
All feathers used must have the vein lip (the majority of the vein surface that run its length) on the same side; in other words, from the same wing of the bird.
There are two methods of splitting a feather.
At the quill end of the feather there is a portion where the feathering abruptly grows toward the opposite side of the vein; from the down-less tip (quill) begining of the feather to where tough, randome feathering ends and the rest of the feathering continues up one side of the vein, the feathering can be removed.

Grab the feathering where the randome feathring begins and peel down and away.
Repeat on the feathering of the other side if it will survive the split and be of use as a fletch - which is not often the case.

The two "sides" of the feather must be split down the center. Find the line in the centre of the quill on the feather, and follow it with the tip of a sharp tool as far possible. I use a very small ulu shaped knife to roll through some of the vein and slince to finish. Glass is what you want to acheive in youre tools. Keep a stone on hand and cardboard to glass.
When it can not be split any further just cut through the feathering on the side which won’t be used or discarded to the length required. Some tamp lightly the vein prior to splitting; I suggest carfully running the flat of you knife down the vein, while the feather is heald flat and firm on a table to flatten the vein and thus make it wider to more easy see and follow while you split it.
Remove from the vegne the excesses feathering. I don’t worry about having perfectly similar fletch from arrow to arrow; this would be impossible with natural feathers, a waste of veins, and for my style of shooting pointless. Obviously, you will naturally try to achieve a symilarity however. Over time of arrow practice and use, natural feathering will take a rough, leaving discrepancies between arrows. You will come to feel the feather surface arrow required for a shaft with time.
Store randome in a box full of slit feather.
Once im ready to fletch, I look for four or three groups of fletch and then clean the gunk and uneven vein remaining on the underside by using a sharp tool while waiting for the wrap sinew to dry. Try to make the whole underside perpendicular to the feathering above.


 |
The second method of splitting, I prefer and is faster; you may also be able to salvage both sides of feather, however it risks damaging both sides of the feather in the process.
Select a feather and put the quill end in your front teeth. Hold firmely the feathers of one side, at the other end and with your other hand, the vein and some feathering of the other side. Pull the two feather sides apart startingfrom the feather tip, keeping the quill TIGHT between all three points.
Some feathers may tear away at the beginning, try again further up.
When you are ready to use these, one side of the feather will retain the full bulk of the feather vein, this must be cut away and reduced before sinew binding to the shaft.
Once split, you can sort, clean and prepare for wrapping as will be shown.
One way to sort the feathers is to wrap with leather. You can pre sort by looking for four matching feathers, wrap them with two wraps of leather, sort another four matching, wrap with two wraps to previous bundle; in this way you simply separate the groups of four but keep all groups in one bundle.
As mentioned previously however, now I just store in a box, ramdome and sorting with similar feathers when ready to fletch.
You should match veins which when measured, cut to length and fletched, produce a conistant air resisance between the arrow feathers; but don’t worry too much about making the feathers on a single shaft perfectly symmetrical as this has little to do with an arrow that shoots true. What I do NOT do is trim the tops of my feathers.
When your shafts are all fletched, it's important for aim to be consistent, the feathering be near of simmilar air resisance from shaft to shaft.
Once feathers of similar shape are found, cut their length of hard vein to near equal, and remove a 1/2cm of feathering from the end so the ammount of feathering is equal on all the arrows feather veins.

Natural sinew must now be wet in the mouth, or soaked in water thoroughly. The longest sinews are ideal. A quick way to soak sinew for this purpose, is to take a thick strand of stored sinew and rub it on a corner of a table or back of a knife; this will break the thin fibers within the thick strand from each other and so water will then soak all far more quickly.
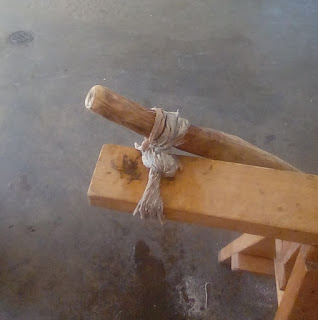
Once the sinew is soaked, position and hold all three feathers from the shaved front ends, around the wood shaft. Position the veins such that the ends, closest to the knock, are roughly 2.5 inchs from the deepest part of the knock groove. I prefer them a distance of length which is just short the length of my index finger forward of the knock; I shoot with the arrow on the outside of the bow and my index finger rests on the shaft to hold it secure to the stave (Slavic hold).
 |
If my finger rested on the feathers they would scrunch and have a negative affect on their performance. If your feathers get scrunched like those shown below, you can briefly run water over the feather and they will easily straighten back out. Spin the shaft so the excess water does not linger.
 |
| Note the scrunching at the front of the feather due to the bow shelf. |
Carfully, with a generously thick strip of sinew begin wrapping the veins to the shaft at the forward end of the feathers. After three tight wraps, adjust the feather so that they are spaced equally from one another.
If you are wrapping four veins to the shaft , wrap two or three securely with a tight loop, then the remainder with the next wrap around.
Wrap multiple loops and knot to secure. When looping sinew in one spot - as would be done at the front of the fletching, the back, and forward of the knock - zig zag over and across the looped threads; this helps to keep the loops from freying and unspiraling after abusive use. Keep the bind as tight as you can while you continue the spiral wrap up. Use a generous thread as you can then confidently wrap the veins secure to the shaft without the thread end pulling away mid wrap.
Air on the side of well spaced spiral wrapps. These arrows bellow have far too many wraps along the vein. The sinews spiral job is realy to keep the vein on the shaft until the final step when the glue is added, as it's really the generous glue that has dried which will hold the feather long after the spiral sinew has fallen away, the feathers have torn fibers, and the arrow has taken shot after shot.

 |
 |
This is a good weight of sinew to use. Save the longest sinew for fletching, I dont often use sinew to sew buckskin when a buckskin thong works. |
Once the full feather and stripped end have been bound with sinew, check to make sure the veins are equally seated around the shaft. If they need much adjustment, redo the binding. If only a little adjustment is necessary, an awl or other sharp tool can be used to move the length of already sinew bound vein.
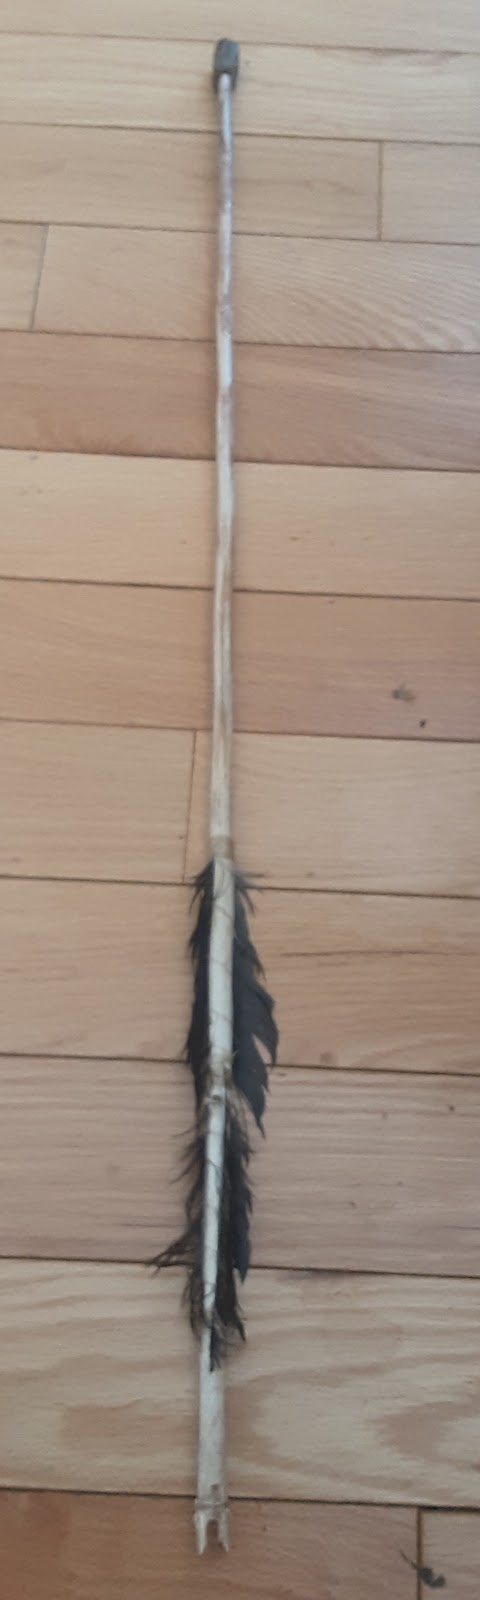
The vein of the feather should have a slight helical, when the feather is finished being wrapped to the shaft.
The spacing of the vein must be even with the same portion of the adjacent vein on the shaft. While wrapping the veins, check and adjust the spacing between veins. You should make sure they are tight, flush with the shaft by pulling the feather in the knock direction. Once properly positioned and the sinew woven through the section of feather fibers, pinch the vein with the sinew using the wrap and hold the sinew down with your thumb. Repeat until you reach the end of the feathers.
When the sinew threads nears their end, bend the end over and, take the end of the next thread and do the same; lock the two ends together and spiral the fold; use pressure on the shaft to keep the spiral; as you continue the wrap, do the same to the connection and the beginning of the next strand.
Be generous with sinew when wrapping feathers; you want secure connections that wont come undone - though despite best efforts, they often will in time. Sinew can often be salvaged - though you probably wont need to - if you end up using your best sinew with a generous conection shown above. The tight shaft bind, drying of the sinews in a tight twist, and glue added later will maintain a solid connection and wrap. Worn feathers will eventually need to be replaced even on a well looked after shaft.


It is now necessary to reinforce the sinew wrappings with hide glue. The glue will keep the knots from coming undone, sinew from fraying during arrow use, and the feather vein lengths from migrating around the shaft shot after shot.
To glue, get hard, hide glue flakes and mix with some water to make the paste. The water must be warmed and the paste as thick as you can make it.
The end of a quill, cut sharp is the best appliacator. Accurate, and holds glue.
Apply the wet glue generously around the sinew at the front end of the fletching then apply up one side of a vein. Apply the glue over the sinew wrappings at the other end and then apply it down the side of each remaining vein. Just apply it where the feather vein is touching the wood shaft. You don't have to get the glue underneath the feather; the glue seeps under there.
Also, use glue to secure the spiraled sinew connections.
When hot, fresh glue is added, keep the shaft pointed to the ground and let the glue dry in this position; this helps to avoid glue running onto the feather.
I use a separate already glue soaked sinew thread, and make a few wraps with the sinew right beneath the knock groove; wrapping sinew here will stop the bow string from destroying the knock on a wood shaft upon arrow release. It also protects the knock woods as I practice in a pretty rough way with my shafts. Dont wrap sinew wet, then glue it later as this will be significantly weaker - soak the sinew with glue, then wrap - except when working on the flatching. Wrapping glue covered sinew to feathers is not a task I'd be willing to expirament with; for the knock sinew wrap step this is necessary.
For all fletch gluing, it is critical, as with most applications, to use the most dense hide glue you can melt.
In the bush I'm sure the natives would have carried a small shallow shell for mixing some dried glue and a little water over a flame. Use only the ammount of water your need glue for the task; this way, what is left will quickly dry to the mix vessel.
I have also made fletch repairs by spitting on a shard and warming it until soft ish. Rub on sinew before aplication and other areas needed.
This technique of fletching is surprisingly resistant to water but it's a good idea to avoid too much moisture.
Show some support - https://buymeacoffee.com/ropesuspenders