The Choke Knife (ulu)
 |
| The first. |
WARNING: Always use a sharp edge in a controlled slicing motion. Do not push the tool directly into the object you want to cut, which is being held by your opposing hand. Be very careful with all cutting tools. Know and keep control of the edge AT ALL TIMES; never lose respect for cutting potential.
Also, use a wood chopping block or glass. NO PLASTIC. Plastic in large amounts will get into your food while chopping if you do. Use a 2x10 (or as wide as possible). hardware lumber—20 inches long will work great—or harvest a nice split log of your own. I also like glass as it's easy to keep a sterilized surface, though you can't chop or slice into it, and the meat slides around a lot. In the bush, just use a log.
It would not be possible to do what I do without this style of tool. The following article will advocate the use of a choke knife, which makes drying and butchering game so simple.
Likely the first cutting tool was a sharp rock that would fit into the palm of a hand—the hand, as a result, would have been located over the edge.
The ulu, or uluit, was a tool that in the past could have been made of stone or copper and was often used by the Inuit women for cutting meat; this knife design was on point and would be if meat from large animals was for the most part all you had to process and to do it in challenging environmental conditions.
In a choice between a conventional knife design and the choke knife, the latter is a no-brainer for (near) all the meat processing tasks.
What is it not? A stabber, a batonner, a woodworker (for this use, an axe choked at the head), a dispatcher, and a tool for initial cuts to the hide, and I don't like chopping fat with it. This IS NOT a tool for roll slicing herbs. This is NOT a tool for cutting pizza slices—use a pizza knife, cheese brain. There are many tasks the choke knife is simply not good at; however, for slicing meat for drying, fine precise meat segmentation, and preservation of energy while doing said tasks, from someone with an enormous amount of experience doing them, there is simply no knife design that will compare. Considering machetes to bush knives to fine kitchen cutters, this position is maintained.
You can and should get a proper carbon steel for your choke knife, but I have cut a pie piece from the skill saw blade, about a 1/3 of the circle; just cut off the teeth, removed the disc paint, beveled, and riveted a low handle on.
The typical long knife is not an optimal downward cutting tool. The knife is a tool that is designed for thrusting, poking, and ease of carry and unsheathing.
If you butcher an animal and junk it all in a chest freezer four or five times a year, a conventional knife is fine.
In a choke knife, the handle position gives it ideal control and pressure right over all of the edge, thus ease of both precise, prolonged, cutting and heavy "axe"-like chopping. Given that the full length of the edge is also at a distance from the hand, it keeps the items cut, clear of the hand, and little edge is wasted before a rehone is necessary.
Axes (or other choppers like machetes and cleavers) are NOT good butcher tools. These chopper tools are very dangerous when tempted into a swing, and they are messy.
If you have butchered with any blade, 3-6", you will at some point hold the blade on the spine for efficiency—holding a conventional knife at the handle requires the movement of your whole arm, but with the choke knife and the handle positioned over the edge, it requires only a flick of your wrist, which also makes it easy to apply downward pressure to a dulling blade.
Most experienced hunters may generally end up with a 3" knife blade, which is ok for pulling apart quarters but not at all efficient for field-preserved drying or detailed butchering. Inexperienced knife users will find that when they get out there, the design of a typical knife
A standard knife design does have its advantages over the CK afield; they provide a dispatching function for wounded animals and can also make the clean initial cuts to the hide, tasks the choke knife fails at. Regular knives can also baton wood and tough animal sections such as the sternum, neck base, and rib tops; for these reasons, the standard EDC-size knife is an essential pair to a choke knife.
With the choke knife, you won't have to sacrifice inches of sharp edge to take advantage of the "long blade"—the round blade makes it such that you can put a huge amount of force into every inch of the blade on a modestly sized tool without focusing too much force on your index finger or using both hands; this is especially helpful when the edge starts to lose its keenness, you neglected to sharpen it, and/or the object is freezing, hard, and/or dense like soft bone.
 |
| 9" of edge, though 6" is quite adequate and has its equal share of advantages |
What I have used are old circular/skill saw blades. Opt for thin to save time in sharpening and energy to carry. The quality of circular saw steel matters. Find a blade that does not have a bit or different edge added or welded to its original intended teeth; with these blades, the steel of the disk is usually very poor quality and will make a CK with near no edge retention.
For a handle, I use antler for the unique structural properties of the material as compared to wood; it is dense and tough, won't split easily, is natural, and is easy to work with simple hand tools.
Use a Dremel tool or angle grinder with a diamond disc tocrevicea crevasse into the antler handle and fit the pie tip of the steel into it. If an antler is used, as wood will likely fail while in use, you can use the angle grinder to grind a crevice/hook in the side of the blade blank to eventually run the nail rivet through as opposed to drilling a hole, as I found punching a hole in the metal with a handheld drill difficult and broke bits.

Food and other debris can get stuck in cracks and between natural antler lumps, harboring (and spreading) bad bacteria, so grind these down to make a smoothish surface for the grip. I use iron nails for bolsters or a wire coat hanger bit for a less robust but still effective tool. Get a length of rivet material and cut both ends so you have a piece just long enough to poke out on both sides of the antler. Slide the rivet through the hole with the blade in the proper position of the handle material and hammer down both ends to mushroom or "peen." Make sure the antler is clear and rounded where the rivet will poke through so when hammering to peen them, you will only be striking the iron. With the edge beveled on only one side, it becomes easy to get the hang of sharpening with time. The inherent curvature of the edge makes it easy to grind the whole length of the blade. If you are working in a concrete-floored room, putting a slicing edge back on is as simple as skating the floor lightly. The keys to using a sharp object are keeping the surface of the stone clean, being mindful of the angle, and having a handy thick thong of leather to finish with a strop. You won't need a saw or axe for large game (though the former can help). The trickiest portions: for ribs, the chest can be split to remove offal, which must be done from the get-go; you can use a strong, stout knife for this and baton with the tip in the cavity and strike the back of the knife just in front of where your hand holds the knife. |

|
| This is a meat tool. |
The the lower neck, cut away to the bone just after the final front rib. If you can, slice the joint tissue that connects the neck to the spine, and use the head and neck to snap the spine.
The sternum can be chopped with a ulu for deer. While chopping, hold one rib side and pull it away from the other—keep your other hand well away from the sternum while chopping it! Stop intermittently to pull the two rib portions apart, then continue. One rib cage can be removed from the spine by slicing the connections just to the side of the vertebral spine "hump" on a deer and pushing the rib sides away from each other—knowing the slice location takes experience. If you don't slow down and check the general locations of the rib to spine connections, you could just crack the rib close to the spine with a hefty object.
The pelvic structure should be chopped and leveraged apart on the inner center for deer to remove the colon and bladder—be careful not to burst the bladder while chopping; you can use a strong clean log to strike the back of a conventional (stout) knife or a saw for moose. This is a difficult task for moose, but it must be done. Removing the offal and opening up the two rear legs as just described should be done as soon as possible after death to move the quarters away from each other to dissipate the body heat.
Remember that instead of taking multiple missed whacks at your target with an axe or chopper, making a mess, the ulu can be pushed into the item, and the bones and joints slowly maneuvered out of the way.
The choke knife is also effective at degreasing porcupine and bear hides. When the hide has been skinned and fleshed, the knife can be used in a scraping motion to burst the fat cells close to the collagen skin (be gentle to not tear the hide or begin to pull hairs through); this scraped oil can be saved and used as a source of calories.
You don't necessarily need a massive or thick CK, as unlike with knives, bigger has a functional advantage when slicing. 6" works; remember, in the bush, pound for pound, every calorie is accounted for.
A final important takeaway is that while using the knife, due to its broad cutting surface, while cutting jerky you want to make a cut, gently pull the cut away at ninety degrees, and keep the choke knife at roughly forty-five degrees, "nicking" the tissue as you move; this seems to be the most effective way to avoid excessive transfer of bacteria that may get on your meat.
If you don't have the hands for making your own, there are many blacksmiths that can be found on Etsy or Google to design a unique one for you. Knives of Alaska make a good-sized commercial one.
In conclusion, experience has shown me that on a spectrum of looking at designs more suited for woodworking tasks and meat-cutting tasks, the ulu is closer to the animal end.
 |
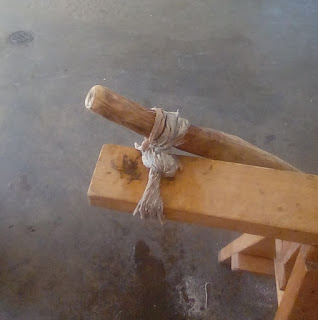
| sheath |
 |
| hide scraper for dry scraping with c clamp addition (save dry shavings for soup) |
For a blade cover I have used a strip of leather with another cloth strip on the inside. Attached to the end of the strip of leather—which is of the shape and size to cover the whole edge when hugging the blade—is another long strip of leather. Cover the blade with the large strip of leather, then use the longer strip to keep it securely covering the edge by wrapping it to the tool. Add the cloth as an additional blade guard. It's quick to make and slow to uncover, but you don't need to be able to quickly expose the blade of a choke knife.


Sure, it looks like a tool that was considered a "woman's tool." This style of blade is a domestic tool for domestic tasks. I don't want Inuit culture to claim the design—nor should they. It's easy to see an ancient pull a stone from their kit to pick apart large game, anywhere the task was done, with a design just like the choke knife, and for far longer and more widely used than the narrow, design of your common knife.
Do I use knives and like them? Big-ish heavy ones and yes. They are easy to unsheath, easy to edge, and poke. But the ulu is needed to dry meat, better to skin and work.

I think my next ulu will have an extended bar to the handle.
Somehow, when you buy a knife, you critique it off the bat for a short period until you buy another... and another. Know that the value of a tool is exclusively determined by the hands that are dedicated to holding it. Don't waste steel or a knife. Love the tool until it is gone and used—then get another.