Suggestion for FAST, natural footwear.
My first shoes goal was to make a boot for use at temperaturs around -5c and lower, something that could be made quickly and easily, did not need to be smoked, and to use both the hair and skin. I wanted little regard for esthetics and that it didn’t have to be flexible; also, I did not want the use of a softening agent.
Make these immediately (or at the latest, immediately after the meat is saved) from the front leg skins of moose, though any hide section can be used. These boots required little attention while drying or "working" the skins.
Ultimately, any hide to be used will look something like a T, and be long enough to reach well behind your heel (being the "top" of the T) to your toes (middle of the post) and flap back over your foot and up some (the base of the T post). The front leg of the moose skin, that which reaches from the toe of the moose to where the hair begins to grow long on the body; this section is difficult to scrape of hair if one was to smoke the body skin the moose, so would otherwise be often discarded. The area suggested worked for me, a man who wears a size 11.5 shoe. If the T is too long, the extra will make a lip on your boot which is functionally and aesthetically fine.
With smoked hide moccasins, one will find that due to water exposure and rough wear to the sole, the work put into smoking, skraping, braining, and sewing motivates a compromise and a search to expedite a shoes construction for more rugged, quick to slip on, use; a shoe however that has limits where the smoked moccasin is more appropriate.
If the raw hide or skin was free of hair and left unsoftened, it would be unbearable to wear. So for this boot, with the hair left on, not only is the shoe wearable when dry without having to wear socks, but they are also insulated as the lower legs are covered in the shortest hair on the moose.
After skinning the lower leg, having made the initial cuts on the moose leg, starting at the sides of the toes, joined after the dew claw, and run down the back and directly over the first leg joint, I allow the hide to lay flat, hair down, on the concrete. It is best to sew the boot before the skin dries.
Fold the lip over and back - rememebering that the pelts toe end will be a flappy stiff lip for the shoe. Where the thong is still attached, begin lacing it through the holes attaching the "lip" part of the pelt to the bottom-and-side-of-footside portion of the boot.

With smoked hide moccasins, one will find that due to water exposure and rough wear to the sole, the work put into smoking, skraping, braining, and sewing motivates a compromise and a search to expedite a shoes construction for more rugged, quick to slip on, use; a shoe however that has limits where the smoked moccasin is more appropriate.
If the raw hide or skin was free of hair and left unsoftened, it would be unbearable to wear. So for this boot, with the hair left on, not only is the shoe wearable when dry without having to wear socks, but they are also insulated as the lower legs are covered in the shortest hair on the moose.
After skinning the lower leg, having made the initial cuts on the moose leg, starting at the sides of the toes, joined after the dew claw, and run down the back and directly over the first leg joint, I allow the hide to lay flat, hair down, on the concrete. It is best to sew the boot before the skin dries.
This project need not include the body surface area of the moose if you choose to make a smoked moose hide of it.
The hide (for this boot project) that is comprising the flap, reaching from the tip of my toe in the boot to the hoof end of the hide is an attached thong that is trimmed from the border. The whole area used must still be moist. If the hide has to be resoaked, to complete this project, and the fur is long, the boot will develop ripe smells with a strong probability that the hair will slip. This project was done in a cold garage averaging 2oC.
A skin that is laced moist with moist thong will dry with an incredibly strong stitch. If the hide was first dried, then stitched, the stich would not be nearly be as strong not to mention the impossibility shaping of the materials.
Said sew thong, roughly a 1/4inch wide is cut on both sides of the raw skin. Then proper sized slits must be made, following the edge, about a 3/4 cm apart, from the attached thong end or where your front toe will sit, to the front-of-your-foot area of the raw skin.
A lace thong with fur has the benefit of plugging the lace holes from snow and you might like the look more than raw hide.
Fold the lip over and back - rememebering that the pelts toe end will be a flappy stiff lip for the shoe. Where the thong is still attached, begin lacing it through the holes attaching the "lip" part of the pelt to the bottom-and-side-of-footside portion of the boot.
The heel is folded up and "laced" in same manner by cutting a strip of thong from the main pelt, making holes and lacing. Do a rough measure check to ensure the raw skin will fit by putting the side flaps around your foot a few times. Trim if necessary from the flesh side, with a razor prior to your lace task.

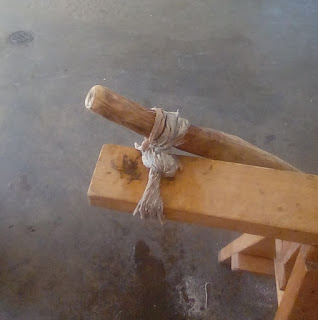
Once properly laced, put the saggy "shoe"s on the end of a couple wood poles or other roughly inch diameter shaft - with a roundish tip. Periodically stretch the shoe on the rounded end of the beam to form and dry in an open shape. Drying may take a few days which is why you may begin the project before cutting the meat or butchering.
I also tried this with the body section of a deer. Be careful to not stretch the lace holes while dry stretching as the deer was not nearly as strong. Also, because deer is not as thick the boot works well as insulation in an over sized moose moccasin shell that can take a bit more of a beating.
String can be used or any other animal derived thong which will require modest holes for the lace. Do know that the holes expand as the boot dries so a hairy thong will help to keep snow from entering by plugging the holes. Both options would benefit from re tightening the lace just before the thong permanently dries.
The boots are insulated for working in dry concrete areas like a garage or periods in bellow freezing outdoors with a bare foot inside. There are times however when my bare foot will get cold, even on concrete. Keep the boot away from water.
Both the front and back legs of the moose were tried and the front creates a far better looking and fitting shoe on its own, but if the hind leg was cut and shaped properly ( or any area of the moose hide properly trimmed for the project) prior to stitching and working dry, it too would fit and look fine.
Make sure the rims are curled and away when forming as they will want to dig while worn.
If the boots get wet more than a few times they will begin to develop musty smells on the inside; this smell disappears when dry again.
Cold snow on the surface is fine if dusted away or batting one against the other after use. The mocs actually work quite well for me in snow (bare feet inside) if I am able to get the bottoms of my sweats to go over the top of shoe and keep the snow out.
Soaking will leave the boot odd shaped once dry. If the sole becomes wet, from stepping on water, the shoe can shrink and dry in odd shapes; wich means pain and blisters.
Some trouble points may be the toe area, so make sure this has ample room on the top; also, the heel may abrade as this where your rawhide stitches will be. If the rims dig into your leg, use pliers to bend it back and away. Focus on giving your toe space while drying. You may want to stuff the toe with cloth while it dries.
On ice, the raw hide exteriors are like having crazy carpets strapped to your foot, so be careful - these shoes alone provided no traction.
 |
| The one on the left is made from the hind leg, the right, the front. As can be seen the front legs make a better form fitting minute moccasin without much trimming prior to the lace procedure, though it would only require a few trimmings and changes prior to stitching for the hind leg to make a well fitting and esthetically similar shoe. |
 |
| The moose leg skin worked well for a 12 mens without much augmentation; however, with the winter coat body hide of deer, the the boot needed quite a bit of augmentation due to additional insulation to fit and be comfortable. I tend to be too conservative in my inital use of materials and require going back and fixing things. If all this is too much work or time, take a dry deer hide and some buckskin. Simply dampen the flesh side until just flexible and fold it over your foot. Make holes where needed and lace where it sags; you will need a few feet of buckskin thong to accomplish this. Remove foot and let the shoe dry. Done. It will shrink and misshape if the foot is removed while the skin is too soggy. These are warm and simple to make. They slightly wear soft over time. |